I have been getting a number of IT people ask me recently about getting/building systems for "heavy" graphics use. The IT folks are used to building systems for doing regular drafting of architectural plans. They want to either begin to hire people proficient in the use of VIZ or MAX or will be doing so themselves. These programs have a habit of always being on the cutting edge of using the latest technology to the fullest and still wanting more from the box. I cannot recommend a particular system or cards since hardware specs and technology change at a phenomonal rate, however I can recommend some basic items to look into when buying or building a system. Figuring out which parts to get really take some research on your part to see what you really want to get. I'll refer to MAX to keep things simple but the same stuff applies to VIZ as well.
Don't skimp - get the best motherboard and chipset money can buy. Something that supports 64bit OS, dual chips with dual cores and the fastest buses and fastest hard drive with a decent graphics card that has either 256 or 512 MB or ram on it. If they go with a 64 bit system they can run 4GB of ram and if they go 32 bit they can run 2GB ram (or 4GB if brave). The temptation may be to buy the part that's a little less expensive than the best and a little less advanced than the best to save some money. If you get the best parts now you'll run through several of your current platform getting phased out before ditching the current graphics station you're putting up now.
Minimum requirements for MAX have started to stray away from setting anything other general items such as OS, minimum processor speed and ram. Here are the basics for what each of the components will help the most with.
OS:
From what I understand a system running a 64 bit OS should be able to handle things twice as well as a 32 bit system, but the application has to be re-written to take advantage of that.Very few programs have done this and MAX 9 will be the first one to do so that I work with in my arena. Getting a 64 bit system will be extremely benificial for programs like MAX because they are data intensive applications - applications like MS word will likely not see much speed improvement from 64 bit systems.
Processor:
This will help in mathmatically based functions that require the chip to crunch lots of numbers. Things this can include are applying modifers to geometry, solving max scripting expressions, and rendering - which is the single most intensive process for a chip. Any machine with one single core chip will be maxed out to 100% of the processors capacity no matter how fast it is. Put in a dual core chip and it can handle almost twice the amount of data. Put in 2 dual core chips and it can handle almost 4 times the amount of data a single core chip can dish out. Why is this important? Because the more data the processor(s) can crunch, the faster the image(s) can be rendered.
RAM:
The more RAM, the more applications you can have open and the files that are actively open can be larger which is often the case with MAX models. If running a 64 bit system, they can "technically" handle up upwards of terabytes of RAM, but again this will most likely be out of the usefulness for most of us. The biggest adavantage will likely come from running in the range of 4-8GB of RAM. Current 32 bit systems max out at 2GB RAM. Unless of course you like getting into the registry and flipping the 3GB switch to allow 4GB of ram to be detected by windows, you can get past the 2GB limit and run with 4GB.
Video Card:
This helps with the display of realtime graphics on the screen as you are modeling in the program. It helps display shadows, materials and other "surfaces" more realistically. Contrary to popular belief, it has nothing to do with helping render faster. The more memory your graphics card has, the smoother items will be displayed when rotating the view on the screen or moving objects around.
Hard Drive:
The faster the RPMs the smoother it can write data to the disk and it can open/access files faster too. This becomes more important the larger the file gets. It also helps when rendering to have a hard drive capable of writing data as fast as possible to avoid dropped frames.
Bus:
The faster the bus, the faster data moves between all the components above.
Here's he links to the latest "minimum requirements" from Autodesk, however this is really just the basics. If you are looking to take these programs into a production environment you will need to go far beyond the basics.
VIZ 2007
http://usa.autodesk.com/adsk/servlet/index?siteID=123112&id=4221521
MAX 9
http://usa.autodesk.com/adsk/servlet/index?siteID=123112&id=5659453
Tuesday, August 22, 2006
Wednesday, August 16, 2006
2D or not 2D?
Funny how just after I started this blog, I was asked a question that leads right into the tile of my blog! A recent question I was asked was someone looking for a way to phase ADT into their drawing process. They wanted to know how to go from 2D to full 3D and if you could use ADT to be a halfway point between 2D and 3D. Full 3D is probably one of the biggest misconceptions about ADT. ADT is not for creating super detailed 3D modelsof your project. You will eat up all your time budgeted for the project very quickly trying to model every single detail. The other part of the question was how to implement ADT in an office with huge resistance to using a 3D application to do their construction drawings.
To give the short answer, yes you can use ADT to make a half way point between 2D and 3D.
The long answer: What was proposed is totally feasible! The cool thing is that they don't have to know they are working in 3D. Just tell them that these are the new tools to help you draw faster in 2D. Use the basic walls, doors and windows to get your floor plans drawn faster. Use the basic door, window and room tags to tag them. Use the basic schedule tables to schedule them. They should never really need to leave a top view in working on the files as all vertical adjustments can be made on the Properties Palette. If you don't want to use walls (I haven't a clue why you wouldn't) you can still insert ADT doors and windows and tag and schedule them anyways. They just won't cut holes in your walls.
Some basic steps:
Implement basic walls, doors and windows and show the users how to draw with these new faster tools. Don't go crazy with multiple component walls, just stick with a single line for each side of the wall and maybe add a hatch to represent the type of wall it is (of course that's provided your firm can deal with that approach - some insist on seeing the gyp, stud, insulation, airgap and brick). Then implement some basic documentation tools such as door, window, room tags and schedule tables to go with them.
Once they've gotten used to those tools show them some more. Hopefully by that time they will have begun to see the light. Slowly implement tools that will continue to bring in gains in productivity and overtime others will begin to use the more complex tools. Use the K.I.S.S. methedology and it will go smoothly. Get super complex with what you're trying to do in ADT right a way and you'll hit a wall with the users. DO NOT switch to full 3D right away as that is not really ADT's strong point. It's there to help you move your users to think more about the design of the building and help them feel more comfortable about 3D. They've been designing 3D structures all their life in a 2D method of conveying the information. Taking it slowly like I've outlined above will help them realize working in 3D for designing 3D buildings is more natural - just don't tell them all that right away! Maybe after a project is completed go back and show them in 3D what they did in 2D.
Hope this helps and didn't bore you too much!
Thursday, August 10, 2006
Paste to original coordinates
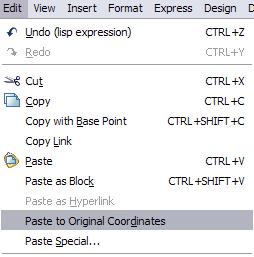
It seems that this is a tool that is often overlooked, yet can be extremely useful in ADT. It also avoids the need to use Copy with Basepoint. If you want to copy objects from one drawing to another and have them be in the same location Paste to Original Coordinates is what you want to use. To use this tool, use the following steps:
1: Select the objects you want to copy to the clipboard.
2: Go to the pulldown menu EDIT and choose the option COPY.
3: Open the drawing where you want to paste the objects to.
4: In the target drawing go to the pulldown menu EDIT and choose the option Paste to Original Coordinates.
This is a great way to duplicate data between drawings - especially if you are using Project Navigator.
Let's get this thing rolling!
I will be posting tips and tricks on using ADT to help get the most out of it. If you haven't figured out from the name of my blog, I have a warped sense of humor.
Subscribe to:
Posts (Atom)
