Thursday, February 22, 2007

How to deal with 300 users that all want it their way - Part 3

So far, we've covered identifying the usage of your software, what is used to accomplish your drawings (content, standards, etc.) and what to do with this informaiton. In this post we will look at using a lovely program I've discovered called Inno Setup ( http://www.jrsoftware.org/isinfo.php ) which helps turn all your files needed to run your content into a nice little executable.

What exactly can Inno Setup do?

Some of the k
ey features include:

  • Supports creation of a single EXE to install your program for easy online distribution. Disk spanning is also supported.
  • Complete uninstall capabilities.
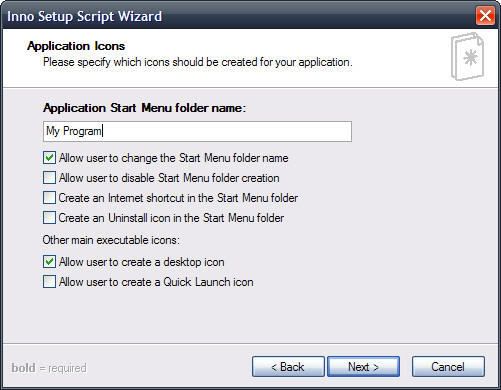
  • Creation of shortcuts anywhere, including in the Start Menu and on the desktop.
  • Creation of registry and .INI entries and modifications.
  • Silent install and uninstall.

Now how do you use it? I found the help system a little lacking (there is a M-FAQ on their website, but that will only get you so far) so if you are going to get into the more advanced portions of the program, you need to endure the help system and be brave to experiment in your script files. Remember, this is a free peice of software, so you can only expect so much. To create the initial script file that will generate the executable (exe) I start by using the wizard provided to get the script started. This will get things rolling and give you a base to add to if you desire more options to be used in the exe. Here are the basic steps used to create the initial script and an explanation of what some of the sections do.

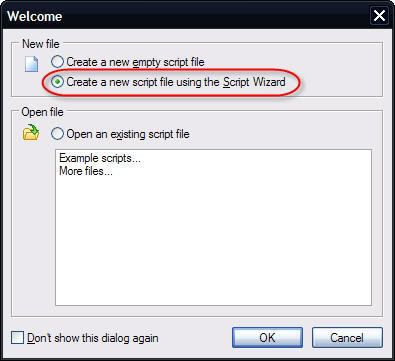
When you first launch it there will be a welcome window asking you what to do. Start with the script wizard for the first file to get you going.

Photobucket - Video and Image Hosting

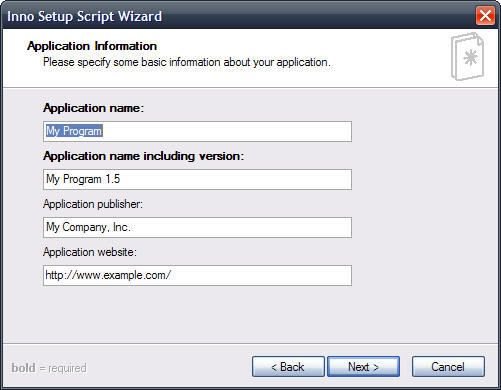
The next thing you will do is to set what the App name, version, publisher and website that you want to use. Versioning is important as it allows you to know if someone has the latest version and to issue updated versions as things get updated or progress.

Photobucket - Video and Image Hosting

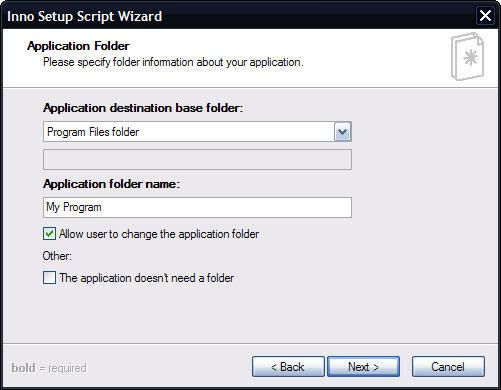
On the next screen uncheck the box "Allow users to change the application folder" since that will really mess things up for your well conceived CAD Standards.

Photobucket - Video and Image Hosting

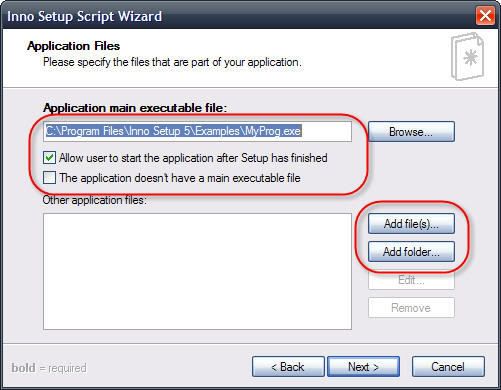
Now you are at a point that requires some thinking. First order of business is to check the box "This application doesn't have a main executable" since the executable is AutoCAD. That is a different exe than the one you are building. This screen is also where you add all folders and files that will be packaged with the exe.

Photobucket - Video and Image Hosting

Next up is a few other items to fine tune per your liking.

Photobucket - Video and Image Hosting

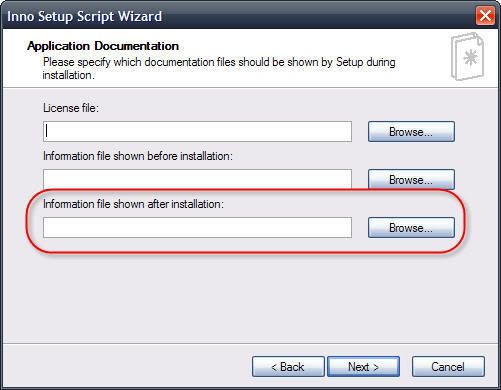
I typically like to show a brief little statement about what just happened on the users computer and what they should do next and this screen is where you do that. Make a txt file and stick it in with your CAD Standards folder and place whatever stuff you want in it. I haven't gotten to the point of needing a license file, hopefully you haven't either.

Photobucket - Video and Image Hosting

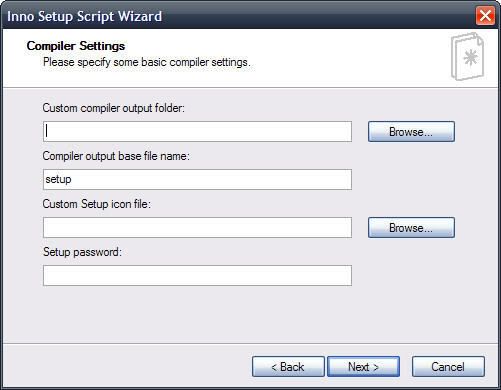
The next screen I leave as is.

Photobucket - Video and Image Hosting

After finishing the wizard, you will find yourself staring at the script file that was just generated. Look for the little icon in the top with the gear (compile) - click it and it will build the exe.

***Important!!!*** Keep a backup of your files somewhere else in the event running the exe you just made messes up your beautiful arraingement! When running the exe the first time, I prefer to test it on a different machine than the one I am using to make really sure it works and runs the way I expect it to.

Thursday, February 01, 2007

How to deal with 300 users that all want it their way - Part 2

As I mentioned in my previous post, there are 2 default setups for the office - one for AutoCAD and one for ADT. Both of these setups run the same program that is installed on the users system from the network location. The setup is placed on the users system with an executable that I build to put everything where it needs to go - more on that later. So a basic install goes something like this:
  1. Run the deployment.exe - this is a silent install which gets everything where it needs to be for ADT.
  2. Run the AutoCAD.exe, click through the buttons for the install wizard.
  3. Run the ADT.exe, click through the buttons for the install wizard.
  4. Launch AutoCAD for the first time - be sure to cancel if asked to migrate previous settings.
  5. Select the appropriate workspace in AutoCAD.

That's about all that a user would need to do to get the basic set of custom content and tools onto their system. The work required behind the scenes is a bit more detailed.

To start with, you need to collect all your content into one location. The computer I use onsite with my customer is what I use. I install the release of software I will be working with. Since no desktop icon is created I will use the shortcut placed in the Windows Start menu -> All Programs. Once the program has finished launching, I'll create a new profile in Options and name it something along the lines of ADT 2006 (as you get more customized and more teams onboard this will need a more detailed description but for now this will suffice). In centralizing the content on my local C drive, I will create a general folder and subfolders if needed.

  • C:\Company CAD
  • C:\Company CAD\fonts
  • C:\Company CAD\Lisp
  • C:\Company CAD\Custom
  • C:\Company CAD\AutoCAD
  • C:\Company CAD\ADT
  • C:\Company CAD\Team A
  • C:\Company CAD\Team B

The list would go on depending on how detailed you wanted to get or however many itterations of the customization you need to build. Each of the paths I listed above are pretty self-explanatory for what would go in them. Inside the folder AutoCAD, the items I would place in there are the menus (cui's), desktop shortcut needed, the exported profile from AutoCAD Options (AutoCAD.arg), the profile.aws file (more on that later) and the readme file for the executable that will install all this on the users system.

Once you have your content localized, you can start customizing your environment in AutoCAD. Start by pointing your paths in Options to point to the folders on your local drive. Then, start configuring your CUI to load any custom content needed such as LISP files, partial CUI's, etc. which should all be located in the folders on the local drive. I usually do not put anything in the startup suite of Appload since all LISP files are loaded with and main, enterprise or partial CUI files provided they are loaded in the CUI.

To help avoid users tampering with the setup of the custom content, I place the AutoCAD CUI as an Enterprise CUI and the office CUI files as partial CUI's inside the AutoCAD CUI. Since the enterprise CUI is read-only, when first configuring your CUI's, you will have to load the AutoCAD CUI in the Main CUI slot inside AutoCAD Options. Once you are done configuring the CUI's drop the AutoCAD CUI file into the Enterprise CUI slot and fill the Main CUI slot in with the custom.cui file that can be found under your username application data folder since all users will have this as a common file on their systems. Then if they want to build custom menus/toolbars or change the way their interface looks they can do so without altering the standard install.

Once everything is setup, go back into options one last time and export your profile to the folder for your customization on your C drive - in this case C:\Company CAD\AutoCAD and name the profile AutoCAD.arg. The other file you need is located in your username application data folder called Profile.aws. There will be a profile.aws in a folder that corresponds to the profile name in AutoCAD. This is the *.aws file you want - the FixedProfile.aws file will do you no good. If you installed AutoCAD (or ADT) via the application defaults for support files then you can find the profile.aws in a location similar to this: C:\Documents and Settings\USERNAME\Application Data\Autodesk\ADT 2006\enu\Support\Profiles. Once inside the last folder in that list, Profiles, you will see folders for each profile available in AutoCAD. Go into the one for the profile we are working with and you will find the file Profile.aws. Copy that file to your folder C:\Company CAD\AutoCAD and you will be ready for the next phase.

Once you get AutoCAD configured and running the way you like, it's time to start configuring the executable. That comes in Part 3.

How to deal with 300 users that all want it their way - Part 1

For one of my current clients, I've had to develop an interesting solution for their environment. While we would like to take the approach to develop the same customization for all users, this simply was not acceptable for this environment. There are over 175 seats of ADT in a 3 building campus and 3 sattelite offices with about 10-20 users each in addition to the main 3 building campus - and they are growing. Within this environment, there are teams of about 15-20 people each. 70% of them use ADT as AutoCAD and 30% as ADT. Each main campus employs a network license server for that office location. They also encourage employees to work from home if needed so they keep laptops ready to be checked out for working from home. In addition they also have consultants which like to use the same tools so that means the consultants need to be able to run the same tools from their end also.

This makes for an interesting scenario. Most of us like to keep everything on the server since that is usually backed up on a nightly basis, can be locked down with permissions to prevent tampering with customized CAD content and is conveinent if a change is required in the content that was customized. However, how do you handle those that want to work from home or the consultants? Those working from home could use a VPN, but think of the logistics and paperwork nightmare this would create for the consulants to be allowed into another companies network. Even if VPN was an option, you would now be at the mercy of the speed of your connection to the outside world and in a production environment this is no good.

This meant that all custom CAD content needed to be located on the users local C: drive. What content? Fonts, menus files (cui), Lisp routines, tool palettes, CAD blocks, etc. Many will counter with the arguement that the user now has local access to this content and can modify it at whim. Well, since the process of placing the content is completely automated, and the users job is architecture - not CAD Management, we have found they leave the custom content alone. We encourage them to submit requests for changes in the content or custom menus instead of them doing it themselves which seems to be working for now.

Currently there are 2 default setups for the general populace. One for AutoCAD and one for ADT. The site employs Architectural Desktop (ADT) solely for ease of installation in a mixed environment such as this. One network delpoyment is created of ADT and installed from that to all users systems. In addition, one deployment per campus is created since each deployment must point to the correct network license server. This means that a total of 4 network deployments are created, one for the main campus and 3 additional ones for each of the sattelite offices. When I build the deployment, I set it so that no desktop icon is created on the users desktop when they install from the software image on the server. I also use the application default for locations of all support files. Also be sure to choose to install Express tools and/or 3D DWF Publishing as they are not turned on by default. The beauty of this is that now I can keep the customization of their CAD content completely seperate from their software installation. I'll discuss that in the next post.


Also, keep in mind that as I discuss this, I will interchange the terms AutoCAD and ADT. At the level we are dealing with here, they are one and the same. They both use similar installation methods and both use the same behind the scene methodologies for running the programs. I am also basing this write-up on 2006 and above platforms of AutoCAD/ADT and you will see plenty of references to CUI's and how to handle them. If you are still in a 2004 or 2005 release of the software, this is still fully relevant since the programs were setup the same for those releases as well. Instead of CUI's, you have the good ol' mns files and the joys of text coding your menus and getting appload to run what you want and such.